Tuesday 30 June 2009

Potatoes!

On Saturday and with great anticipation Emily and I picked the two Red Duke of Yorks that had been growing well in an old recycling container on our patio. We turned it out and started rummaging through the compost expecting a bumper crop of spuds.
This is what we managed to get from two plants that had been growing since early April:
haul of red duke of york
Red Duke of Yorks from two plants

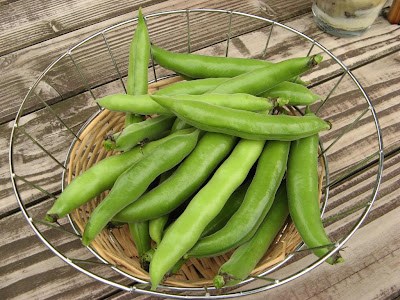
In order to supplement the potatoes for the evening meal Em and I then picked the broad beans that were ready. It's probably a reasonable amount from four dwarf Sutton plants.
broadbeans
We picked all the broad beans that were ready

Once picked Em and her granddad set about shelling them. We offered the bean cases to Patch the guinea pig but, understandably, she turned her nose up at them!
em and her granddad shelling beans
Emily and her granddad shelling beans

One benefit of growing potatoes in containers is that they come out of compost a lot cleaner than out of the soil. Speaking of soil, I did plant one Red Duke of York down in the potato patch at the end of the garden. Emily and I dug up that plant but found nothing apart from one tiny little tuber. Anyway, after a nice cleanup the potatoes were ready for their weigh-in. They came in at 862g which is 1lb 14oz in old money. With the potato I snaffled a couple of weeks earlier, I reckon that's 2lb of spuds, 1lb per plant. I don't know how good that is. It doesn't sound a lot and I was expecting more. Maybe I should have watered more.
all cleaned up and ready for the weigh in
Beans and Pots all cleaned up and ready for the weigh in

So we enjoyed the potatoes and broad beans with some gammon and parsley sauce, eaten al fresco. Beautiful.
Monday 22 June 2009

Strawberry Cuttings

On Saturday I was taking care of our little strawberry patch. I know you are meant to put straw under the plants to keep the fruit off the floor to stop them going rotten. Now we don't have straw, but we do have some hay which is used for Patch the guinea pig. And seeing as Patch likes the cut off tops of strawberries, I think it's only fair that some of her hay is used for the purpose of getting better strawberries. She'll reap the rewards - eventually!

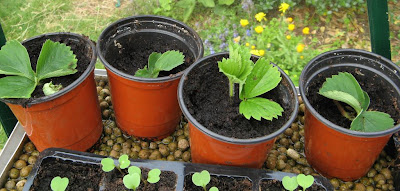
So while I was putting a bed of hay down under the plants I noticed a few runners stretching across the patch. Now these are only young plants so I don't want them putting lots of energy into producing runners so I started to cut them off. I discovered that they had started to try and put down roots in several places. As an experiment I collected up the tiny little rooted plants and put them in pots more as an experiment than anything else. There were four in total at various stages - some not much more than a leaf or two and one only had little stubs rather than real roots. If they work then all well and good but I'm not really expecting much. Saying that, it's been a couple of days and they have not died yet!
strawberry cuttings
Tiny little strawberry cuttings - see how they grow

I think the best way to take cuttings from strawberry plants is to let the runner grow and place pots full of compost along it at the points where it wants to root down. Then gently peg the runner down into the pot so that it grows in the pot. Once it's nicely established the new 'sister' plant can be severed from the 'mother' plant. I'll try this later in the year.

Friday 19 June 2009

Cucumber Update

cucumber plants in pots
Our three cucumber plants in troughs

It's been just over two weeks since I planted the three cucumber plants in troughs (there were four, the fourth being very weak and suffering from root rot. RIP). They've been doing very well and I'm trying to not water them too much. Luckily the weather's been helping me out by being rather cold and miserable!

This morning, however, I decided to have a close inspection of the plants to see what I could see. I thought cucumbers grew off stalks that in turn grow off the main stem (a little like tomatoes) but it turns out they grow right off the main stem, just where the leaves join. At the moment they are tiny. This one is about the biggest and it's about 1cm long. There are quite a few on all three plants, easily identified by the star-like flower bud.
tiny cucumber
Tiny cucumber - the flower's not anywhere near ready to open

Hopefully the weather will warm up a notch and they'll thrive.

Meanwhile, in another part of the garden - well, several parts of the gargen - there are the French Beans which are starting to flower now. Not very exciting flowers it has to be said. But so long as they do the job they're ok with me. This is the most advanced plant with maybe half a dozen pods on it, these being the biggest.
thin french beans
Slowly but surely, the arrival of French beans

Monday 15 June 2009

Pride before a fall

After the massive confidence boost of Saturday's potato find, we thought it would be nice to enjoy some of the beautiful potatoes with last night's dinner. So Emily and I headed off to the container where the Red Duke of Yorks are growing. Emily was holding the little basket ready for taking our treasures back to the house. I explained the rules of engagement, just in case: "If we only find small ones then we stop looking". After quite a bit of tentative searching in the potato equivalent of a lucky dip, this is what I found:
two tiny spuds
Not the biggest potatoes we've ever seen

These two monsters measured about 1cm each! Emily was keen to dig up the whole lot in the quest for bigger spuds but I got cold feet and abandoned the whole search. So it was heavy hearts and an empty basket that we headed back to the house. In fact we did find a bigger potato but it was half rotten and old looking - I'm fairly sure it was one of the seed potatoes that got planted originally.

Anyway, not to be out done, I put the tiny little marble-like potatoes in the oven whilst our dinner was cooking. Although they were very small, when they were cooked they still tasted great.

I've since been trying to find out when the potatoes should be ready. Reports vary from 1 week to 3 weeks after the first flowers appear. Now, our flowers appeared a good two weeks ago, and Saturday's potato can't be the only decent one there, surely. Maybe we gave up too soon. I think I'll wait until next weekend and then have a braver search.

Saturday 13 June 2009

First Potato!

first red duke of york
Our very first Red Duke of York!

We have a potato! YES!

This morning Emily was looking at the potato plants in the containers and asking when they'd be ready. So I decided to have a furtle about in the Red Duke of Yorks. After a little blind searching this is what I came out with! I was well chuffed! Look at the great colour. Although Emily doesn't look too sure about it.
Em looking af first potato
Em's wondering how it'll feed our family of four

We simply boiled it all on its lonesome (skin on of course) and ate it with some butter on it. It tasted great and everyone liked it. We might get some more up for tomorrow's evening meal.

I'm not sure what makes it so satisfying about growing potatoes. Maybe it's the same with other root vegetables. I think it's the fact that you are not certain you'll get anything until you start digging. With the regular vegetables that grow above ground you can see them getting a little bit bigger every day. But potatoes are different. It's like setting them off on autopilot when you plant the original tuber and hope that they do what they're supposed to do by the time you come to dig them up.

Thursday 4 June 2009

First Courgette

Meet our first courgette! Picked this very morning. Ok, so it's a little wonky and wouldn't make it past an EU market inspector but hey - it's the first proper produce from Matt's Patch (lettuce doesn't really count). So, in anticipation of a glut of courgettes I've been looking up recipes. Obviously there's fritters, but I'm more interested in Courgette Cake (a bit like carrot cake but, you've guessed it, with courgette instread). Another recipe I've found was on a Waitrose card for Minted Courgette Soup.
first courgette
First courgette - hopefully one of many


I also thought I'd show the progress of the broad beans - they're coming along nicely. I've found a recipe for these too that I want to try - from the Guardian's gardening blog. I haven't planted our French beans out yet, so broad beans are all we've got to look at at the moment.
broad beans
Beans are getting fatter - won't be long now ...


What I have done is to give the 4 cucumber plants a bigger home. This is two of them in a trough. As for the other two (not pictured), one is a bit of a runt so may not make it through the stress of moving house! Let's hope they do better than the last lot, otherwise I'll just give up with cucumbers.cucumbers in trough
Cucumbers have been moved to bigger homes


Our tomatoes seem to be quite a way behind other people's. Never the less, they have started producing flowers which I am duly tapping when I pass by to help with pollination. I'm also pinching out the side shoots that grow between the main stem and the side leaves. This leaves a nice smell of tomatoes on your hands! tomatoes in flower
A little late but we have tomato flowers


Emily and Megan can't wait for more sunshine to help ripen the strawberries. They're so very close to being ready it's painful. Even with the mesh over them, something has still managed to get in and half-eat a couple. Why do they do that? If you don't like strawberries LEAVE THEM ALONE! GRRRR!strawberries nearly red
mmmmm! Strawberries. Gorgeous!

Monday 1 June 2009

DIY New Planter

On our patio are two old and decrepit planters. They are falling apart and too rotten to mend so we decided to replace them. Over the glorious weekend I set about building a new one from scratch. With a length of 2x2, two decking boards cut in half for the sides and a sheet of plywood I was ready for action.
getting things set out
Getting things set out

Four lengths of 2x2 were sawn to join the decking boards at the corners, with the screws offset from each other on each side. After a while I had the main frame completed. This proved a little more tricky than it looked as it was quite hard making sure everything lined up straight. The paved patio is not perfectly level so I couldn't really use that to get square.
outside frame
The outside frame is complete

Once the frame was done it was time to cut the sheet of plywood and screw it into place. Due to the dimensions of the board, there was a slight gap down the center but this was good as it will be used for drainage. Honestly, it was planned that way.
plywood base added
The plywood base is on

I cut the remaining length of 2x2 into 4, mitred at 45°. These were attached to the corners of the base. An additional length of spare plank was cut and added across the base to support the plywood. I also mixed up some PVA primer with water to make a sealant and coated the plywood and any cut surfaces of wood. Hopefully this will help extend the life of the planter.
making supports
Added feet to keep planter off the ground

The decking boards had been pre-treated with preservative so to stop whatever chemicals are in there from leeching out and potentially getting into the plants I lined the whole inside with plastic. I then made a few cuts in it to allow excess water to drain out. Hopefully the plastic will help retain water too.
lined with plastic
Lined with plastic

So with the planter completed, I started to fill it with earth reclaimed from one of the others that was being replaced. After a few bucketfuls had gone in it dawned on me that I should put in in situ before filling it any more! I'd never be able to move the thing when full!
filled with earth
Nearly there - filled with earth

Once in place and filled I added some bonemeal and mixed it in well, then gave it a good soaking. Then it was off to the greenhouse to transfer some of the lettuces that had been growing. I also put in the bell peppers than needed a bigger home. Phew! So there it is, woodworking lesson #2. It looks great and I'm very pleased with it.completed planter filled with lettuces
Done! Instant lettuces too!